While it’s a new year and I thought for my new years resolution that I would get back into doing a side project in my spare time. In my day job I do a lot of Java development but in the past I’ve typically taken on a side project doing something different from what I do for work to exercise the brain and keep my skills sharp. The last side project I did was an Android application called OnTrack Diabetes and it was a good experience that gave me some appreciation for mobile development.
I’ve been using Linux now for almost three years with the GNOME desktop environment so this time around I figured I’d get into writing a GTK+ 3 application and blog about the experience here. In terms of an application, I’m going to start with something relatively simple which is a Visual Grep tool. While I’m perfectly comfortable using grep from the command line, there are use cases for me where I like to have a GUI as I’m doing some analysis on code or other files that requires me to access the grep results in a random but persistent way.
So my first task was selecting a language for the development of this application. The two languages I considered are Python and Vala since they are both first class GNOME languages with excellent GTK+ 3 bindings. After doing some investigation, I decided to go with Python for this application for a couple of reasons. The first is that Python is more widely used then Vala which isn’t used anywhere outside of GNOME development as far as I can tell. This leads into the second reason which is that learning Python better actually benefits my day job as I’m often writing WebLogic scripts in Jython. The final reason is that Python has more mature tools then Vala.
Now that the language decision was made, the second order of business was to get an IDE setup. I opted for the PyCharm Community Edition from JetBrains. It appears to be a robust Python IDE with full support for code completion, re-factoring and debugging. Also, it didn’t hurt that I have heard nothing but good things about IntelliJ which is the JetBrains IDE for Java. Installing PyCharm in Arch is simple using the AUR package for it.
After installing PyCharm, I copied in my first GTK 3 program from a tutorial as follows:
[python]
from gi.repository import Gtk
win = Gtk.Window()
win.connect(“delete-event”, Gtk.main_nquit)
win.show_all()
Gtk.main()
[/python]
And this is where I ran into my first problem. The first line had a red underline for the Gtk import indicating PyCharm could not resolve it and code completion wasn’t working for any GTK classes. After doing some googling I could see that this was a common complaint. Apparently GTK 3 uses introspective bindings which are problematic for some IDEs. PyCharm was supposed to handle it by generating a skeleton (hit Alt-Enter after Gtk and select “Generate stubs for binary module”) but it never worked for me.
Instead I ended up using a package called fakegir which generates skeleton source files for the GTK 3 API. To use fakegir, I first imported the python-lxml dependency fakegir requires and then executed the fakegir script using the following commands:
[bash]
git clone https://github.com/strycore/fakegir
cd fakegir
python3 fakegir.py
[/bash]
And this is where I hit my next issue when I got the following error:
[bash]
…
Parsing /usr/share/gir-1.0/Cogl-2.0.gir
Traceback (most recent call last):
File “fakegir.py”, line 234, in
generate_fakegir()
File “fakegir.py”, line 226, in generate_fakegir
fakegir_content = parse_gir(gir_path)
File “fakegir.py”, line 195, in parse_gir
namespace_content = extract_namespace(namespace)
File “fakegir.py”, line 165, in extract_namespace
namespace_content += insert_enum(element)
File “fakegir.py”, line 88, in insert_enum
if enum_name[0].isdigit():
IndexError: string index out of range
[/bash]
To work around this, I patched the fakegir.py to simply ignore this exception. Not sure if this is the best route to fixing the issue (Hey I just started learning Python!) but it worked for me:
[python]
def insert_enum(element):
“””Returns an enum (class with attributes only) as text”””
enum_name = element.attrib[‘name’]
docstring = get_docstring(element)
enum_content = “\n\nclass %s:\n \”\”\”%s\”\”\”\n” % (enum_name, docstring)
members = element.findall(“{%s}member” % XMLNS)
for member in members:
enum_name = member.attrib[‘name’]
try:
if enum_name[0].isdigit():
enum_name = ‘_’ + enum_name
except IndexError:
print(“Enumeration failed ” + enum_name)
continue
enum_value = member.attrib[‘value’]
enum_value = enum_value.replace(‘\\’, ‘\\\\’)
enum_content += ” %s = ‘%s’\n” % (enum_name.upper(), enum_value)
return enum_content
[/python]
Notice the new try…except, apparently the XML element causing this issue does not have a ‘name’ attribute hence why it fails. Like I said my fix probably isn’t the greatest but it gets it going.
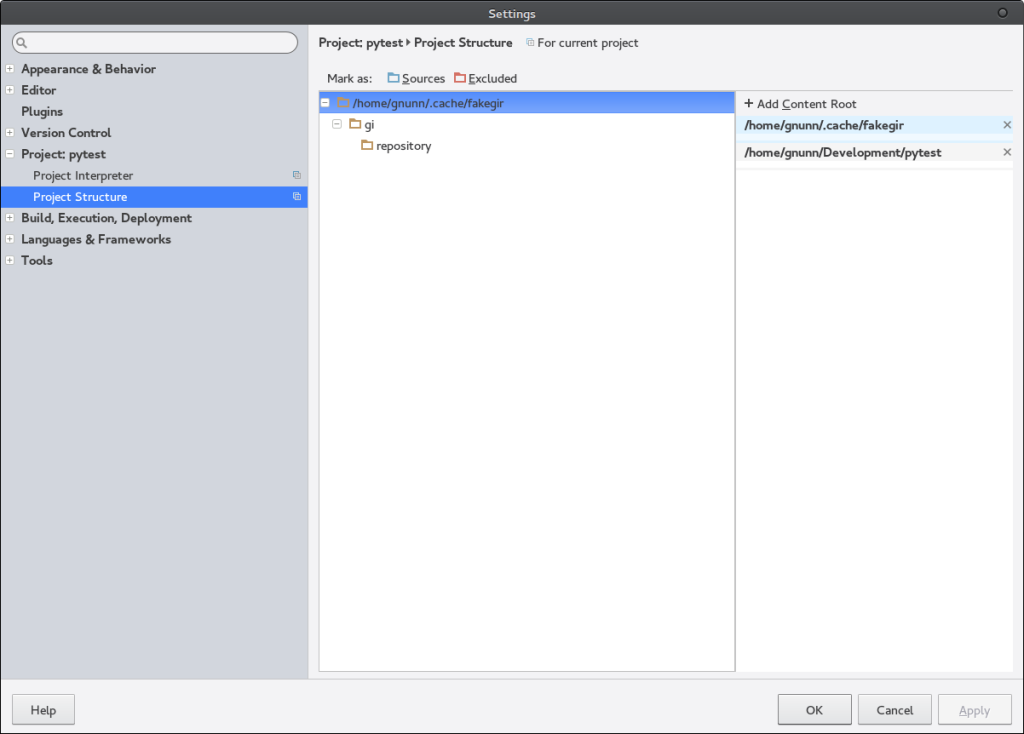
Once the fakegir cache is generated, you have to add it as a content root in PyCharm as per the screenshot below:

Once this is done, code completion works successfully:

However if you try to run the application within PyCharm it now fails because the fakegir files are supplanting the real GTK 3 implementation. To workaround this, I disabled the options in Run Configurations to “Add content roots to PYTHONPATH” and was able to run the code successfully within PyCharm.

So that’s my first entry on my foray into the world of Python, GNOME and GTK+ 3 development. As I work through this application I’ll update the blog with my progress, hope you’ll find it interesting.


