
I made a recent post on Linkedin about the benefits of operating a homelab as if you were an enterprise with separate teams, in my case platform and application teams. There were a number of comments on the post asking for more information on my homelab setup so in this post let’s dig into it.
Background
I started my Homelab simply with a single machine running a Single-Node OpenShift (SNO) cluster. This machine had a Ryzen 3900x with 128 GB of RAM and has since been upgraded to a 5950x. It also doubled (and still does) as my gaming machine and I dual boot between OpenShift and Windows, this made it easier to justify the initial cost of the machine since I was getting more use out of it then I would have with a dedicated server.
Note I made a conscious decision to go with consumer level hardware rather than enterprise gear, I wanted to focus more on OpenShift and did not want to get into complex network management or racked equipment. My house does not have a basement so the only place I have for equipment is my home office and rack servers tend to be on the loud side. I’ve also opted to use a consumer grade router and separate network switch to run a 2.5G ethernet network in my home office versus a full blown 10G network with a managed switch, pfsense, etc.
I originally started with libvirt and three OpenShift nodes running as KVM VMs on my single server however this was using a lot of resources for the control plane. Once OpenShift SNO fully supported upgrades I switched over to a single SNO bare metal installation which was more performant and allowed for better utilization of resources. The only downside with SNO is I cannot run any workloads that explicitly requires three nodes but fortunately nothing I needed had that requirement.
This was my setup for a couple of years however a colleague with a similar setup had been running a second server to act as a hub cluster (i.e. Red Hat Advanced Cluster Manager and Red Hat Advance Cluster Security) and I decided to follow suit. I ended up buying a used Dell 7820 workstation earlier this year with dual Xeon 5118 processors off of eBay and then expanded its memory to 160 GB. As I joke with my wife though, one purchase always begets a second purchase…
This second purchase was triggered by the fact that with two servers I could no longer expose both OpenShift clusters to the Internet using simple port forwarding in my Asus Router given the clusters are running off the same ports (80, 443 and 6443). I needed a reverse proxy (HAProxy, NGINX, etc) to be able to do this and thus a third machine I could run it on. My two OpenShift cluster machines are started and stopped each day to save on power costs, however this third machine needed to run 24/7 so I wanted something efficient.
I ended up buying a Beelink SER 6 off of Amazon on one of the many sales that Beelink runs there. With 8 cores and 32 GB of RAM it has plenty of horsepower to run a reverse proxy as well as other services.
So with the background out of the way, let’s look at the hardware I’m using in the next section.
Hardware
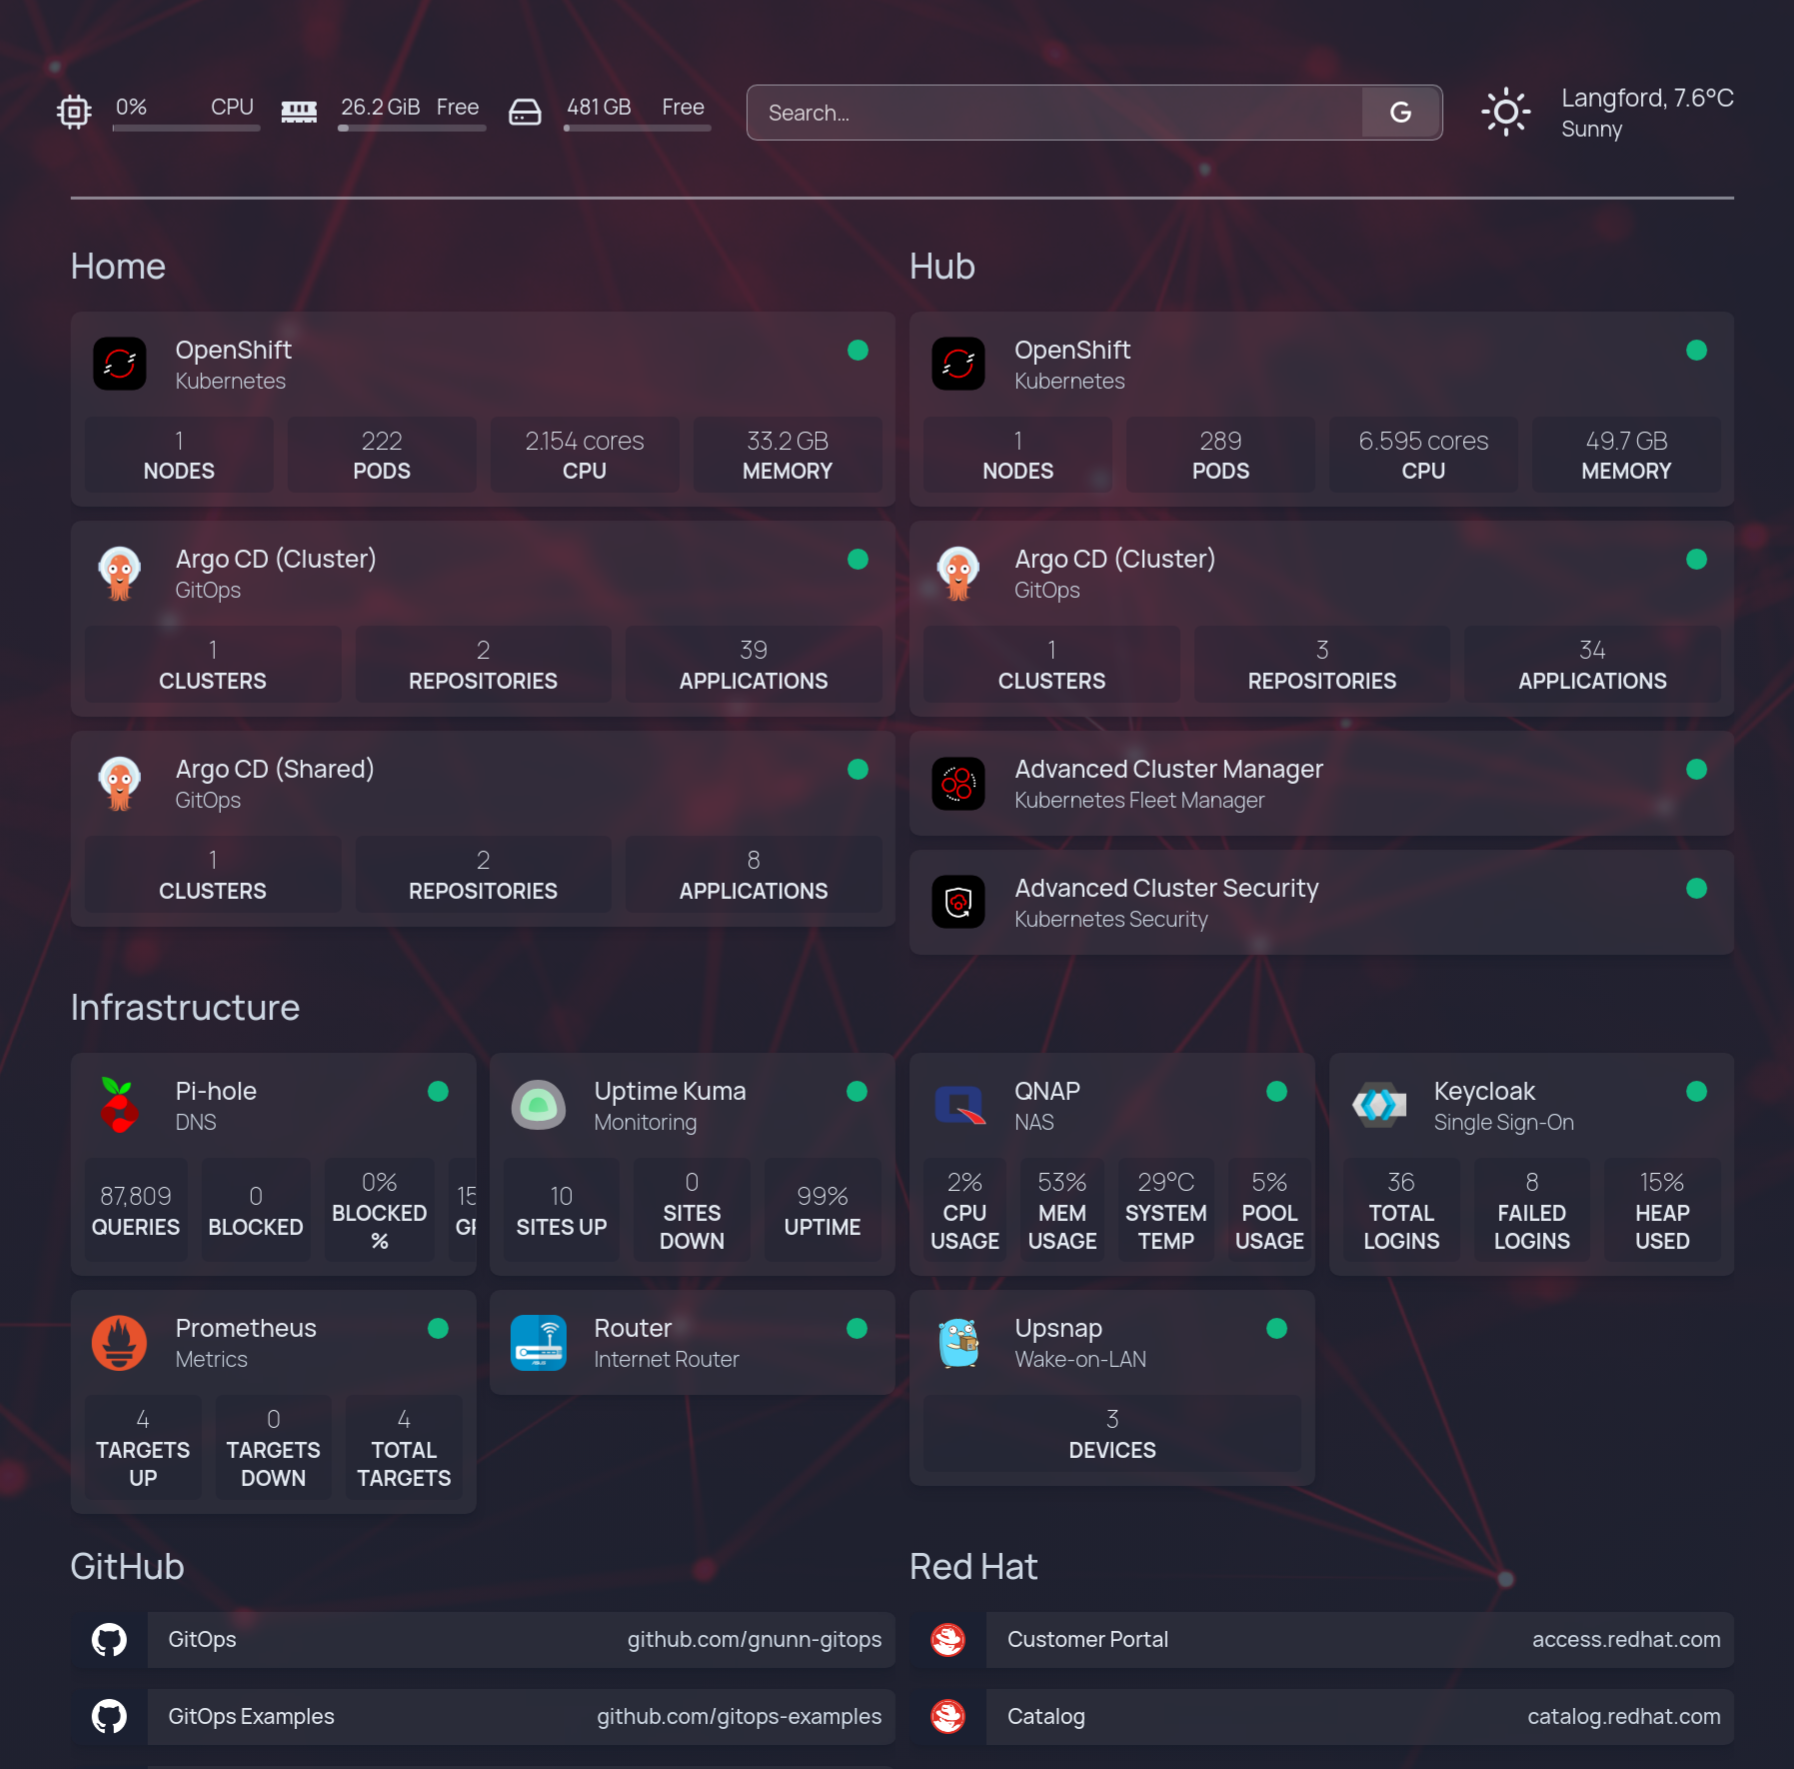
In my homelab I currently have three servers, two of which are running individual OpenShift clusters (Home and Hub) and the third is the Beelink (Infra) running infrastructure services. Here are the complete specs for these machines:
| Home Cluster | Hub Cluster | Infra Server | |
|---|---|---|---|
| Model | Custom | Dell 7820 Workstation | Beelink SER 6 |
| Processor | Ryzen 5950x 16 cores |
2 x Xeon 5118 24 cores |
Ryzen 7 7735HS 8 cores |
| Memory | 128 GB | 160 GB | 32 GB |
| Storage | 1 TB nvme (Windows) 1 TB nvme (OpenShift) 1 TB nvme (OpenShift Storage) 256 GB SSD (Arch Linux) |
1 256 GB nvme (OpenShift) 2 TB nvme (OpenShift Storage) |
512 GB nvme |
| Storage | 2.5 GB (Motherboard) 1 GB (Motherboard) |
2.5 GB (PCIe adapter) 1 GB (Motherboard) |
2.5 GB (Motherboard) |
| GPU | nVidia 4080 | Radeon HD 6450 | Radeon iGPU |
| Software | OpenShift | OpenShift Advanced Cluster Manager Advanced Cluster Security |
Arch Linux HAProxy Keycloak GLAuth Homepage Pi-hole Prometheus Upsnap Uptime Kuma |
Note that the Home server is multi-purpose, during the day it runs OpenShift while at night it’s my gaming machine. Arch Linux on the SSD boots with systemd-boot and let’s me flip between OpenShift and Windows as needed with OpenShift being the default boot option.
The storage on the machines is a mixture of new and used drives hence why some drives are smaller or are SSDs versus nvme drives. Like any good homelabber reuse is a great way to save a few bucks.
I also have a QNAP TS-251D which is a two bay unit with 2 x 4 TB spinning platters, I mostly use this for backups and media files. On an as needed basis I will run a Minio container on it for object storage if needed to support a temporary demo. Having said that this is the part of my homelab I probably regret buying the most, using the cloud for backups would have been sufficient.
Networking
My networking setup is relatively vanilla compared to some of the other homelabbers in Red Hat, networking is not my strong suit so I tend to stick with the minimum that meets my requirements.
It all starts with HAProxy on the infra server routing traffic to the appropriate backend depending on the service that was requested. This routing is managed by using SNI in HAProxy for TLS ports to determine the correct backend and you can see my configuration here.
My homelab is using split DNS where my homelab services can be resolved both externally (i.e. outside my house) and internally (i.e. in my home office). Split DNS means that when I access services from my house I get an internal IP address and when I’m out I get an external IP address. The benefit of this is avoiding the round trip to the Internet when I’m at home plus if your ISP doesn’t let you route traffic back to the router (i.e hairpinning) this can be useful.
To manage this I use pi-hole to provide DNS services in my home as per the diagram below:

The external DNS for my homelab is managed through Route 53, this costs approximately $1.50 a month which is very reasonable. Since the IP address of my router is not static and can be changed as needed by my ISP, I use the built-in Asus Dynamic DNS feature. Then in Route 53 I simply set up the DNS for the individual services to use a CNAME record and alias it to the Asus DDNS service which keeps my external IP addresses always up to date without any additional scripting required.
For the internal addresses I have DNSmasq configured on pi-hole to return the local IP addresses instead of the external addresses provided by Route 53. So when I’m home pi-hole resolves my DNS and gives me local addresses, when I’m out and about Route 53 resolves my DNS address and gives me external IP addresses. This setup has been completely seamless and has worked well.
Infrastructure Services
In the hardware section I listed the various infrastructure services I’m running, in this section let’s take a deeper dive to review what I am running and why.
HAProxy. As mentioned in the networking section, it provides the reverse proxy enabling me to expose multiple services to the Internet. For pure http services it also provides TLS termination.
GLAuth. A simple LDAP server that is used to centrally mnanage users and groups in my homelab. While it is functional, in retrospect I wish I had used OpenLDAP however I started with this as my original Infra server, as a test, was a NUC from 2011 and was far less capable then the Beelink. At some point I plan to swap it out for OpenLDAP.
Keycloak. It provides Single Sign-On (SSO) via Open ID Connect to all of the services in my Homelab and connects to GLAuth for identity federation. It also provides SSO with Red Hat’s Google authentication system so if I want to give access to my homelab to a Red Hatter for troubleshooting or testing purposes I can do so.
Homepage. Provides a homepage for my Homelab, is it useful? Not sure but it was a fun configuring it and putting it together. I have it set as my browser home page and there is a certain satisfaction whenever I open my browser and see it.
Upsnap. For efficiency reasons I start and stop my OpenShift servers to save on power consumption and help do a tiny bit for the environment. However this means I need a way to easily turn on and off the machines without having to dig under my desk. This is where Upsnap comes into play, it provides a simple UI for wake-on-lan that enables me to easily power up or down my servers as needed.
As a bonus I can VPN into my homelab (this isn’t exposed to the Internet) to manage the power state of my servers remotely.

Uptime Kuma. This monitors the health of all of my services and sends alerts to my Slack workspace if any of the services are down. It also monitors for the expiration of TLS certificates and sends me an alert in advance if a certificate will expire soon. It’s very configurable and I was able to tweak it so my OpenShift servers are considered in a maintenance window when I shut them down at night and on weekends.

Pi-hole. Covered in the network section, this is used to manage my internal DNS in my homelab. It’s also able to do ad blocking but I’ve disabled that as I’ve found it more trouble then it’s worth personally.

Prometheus. A standalone instance of Prometheus, it scrapes metrics for some of my services like Keycloak. At the moment these metrics are only being used in Homepage but I’m planning on getting Grafana installed at some point to support some dashboards.
My infrastructure server is configured using Ansible, you can view the roles I have for it in my homelab-automation repo. A couple of notes on this repo:
- It’s pretty common that I run roles ad-hoc so you may see the playbook configure-infra-server.yaml constantly change in terms of roles commented out.
- This repo generates the TLS certificates I need but I haven’t gotten to the point of running it as a cron job. At the moment when uptime-kuma warns me a certificate is about to expire I just run the letsencrypt roles to re-generate and provision the certs on the Infra server. (Note on OpenShift this is all handled automatically by cert-manager)
- The Keycloak role is a work in progress as fully configuring Keycloak is somewhat involved.
OpenShift
I run two OpenShift clusters using Single Node OpenShift (SNO) as discussed previously. Both clusters are configured and managed through Advanced Cluster Manager (ACM) and OpenShift GitOps (aka Argo CD). While it’s too long to go into details here, I basically have some policies configured in ACM that bootstraps the OpenShift GitOps Operator along with a bootstrap cluster configuration application, using the app-of-app pattern, onto the clusters managed by ACM.
In this GitOps Guide to the Galaxy youtube video I go into a lot of detail of how this works. However note that I’m always iterating and some things have changed since then but it still is good for seeing the big picture.
Once the operator and the Argo CD application are installed on the cluster by ACM, sync waves are used to provision the cluster configuration in an ordered fashion as illustrated by the image below (though the image itself is a bit dated).

Periodically I will temporarily add clusters from the cloud or the internal Red Hat demo system to show specific things to customers, bootstrapping these clusters becomes trivial with ACM using this process.
I run quite a few things on my cluster, here are a few highlights with regard to specific items I use in my clusters:
LVM Storage Operator. This provides dynamic RWO storage to the cluster, it works by managing a storage device (nvme in my case) and partionining it as needed using Logical Volume Manager (LVM). This is a great way to have easy to manage storage in a SNO cluster with minimal resources consumed by the operator.
External Secrets Operator. I use GitOps to manage and configure my clusters and thus need a way to manage secrets securely. I started with Sealed Secrets, which worked well enough, but once I added the second cluster I found it was becoming more of a maintenance burden. Using the External Secrets Operator with the Doppler back-end externalizes all of the secrets and makes it easy to access secrets on either cluster as needed. I wrote a blog on my use of this operator here.
When ACM bootstraps a cluster with the GitOps operator and initial application, it also copies over the secret needed for ESO to access Doppler from the Hub cluster to the target cluster.
Cert Manager. Managing certificates is never fun but the cert-manager operator makes it a trivial exercise. I use this operator with Lets Encrypt to provide certificates for the OpenShift API and wildcard endpoints as well as specific cluster workloads that need a cert.
Advanced Cluster Security (ACS). This is used to provide runtime security on my clusters as it scans images, monitors runtime deployments, etc and is an invaluable tool for managing the security posture of my Homelab. The Hub cluster runs the ACS Central (the user interface) as well as an agent, the Home cluster just runs the agent which connects back to Central on the Hub.
OpenShift Configuration
My OpenShift configuration is spread across a few repos and, well, is involved. As a result it is not possible to do a deep dive on it here however I will list my repos and provide some details in the table below.
| Repository | Description |
|---|---|
| cluster-config | This repo contains my cluster configuration for the home and hub clusters as well as clusters I may add from AWS and the Red Hat demo system. |
| acm-hub-bootstrap | This is used to bootstrap the ACM Hub cluster, it has a bash script that installs the ACM control plane along with the policies and other components needed to bootstrap and manage other clusters. |
| cluster-config-pins | I use commit pinning to manage promotion between clusters (i.e. rollout change on lab cluster, then non-prod and then prod). This repo is used to hold the pins, it’s a work in progress as I’ve just started doing this but I’m finding it works well for me. |
| helm-charts | This repo holds the various helm charts used in my homelab. One notable chart is the one I use to generate the applications used by the bootstrap app-of-app. |
Alerting
I setup a free workspace in Slack and configured it as a destination for all of my alerts from OpenShift as well as other services such as uptime-kuma. Since I use my homelab for customer demos being proactively informed of issues has been really useful.

Conclusion
This post reviewed my homelab setup, in a somewhat rambling fashion, as of December 2023. If you have any questions, thoughts or ways I could do things better feel free to add a comment to this point.


